Do you want to see your own website climb Google’s rankings? If so, there is only one path to success: you need to implement solid on-page SEO practices consistently over a long period of time.
To help with this, you will want to take advantage of Yoast’s free SEO plugin, which is perhaps the most important tool you can have on your WordPress dashboard.
Yoast helps you optimize your on-page SEO by providing real, actionable feedback on your content – both its SEO-friendliness and its readability.
Whether you’re new to SEO, or whether you have some familiarity but want to learn how to better navigate the Yoast plugin, you’ve come to the right place! Today, I’m going to show you how to optimize a page or blog post on your site using Yoast – from start to finish, step by step, with clear instructions and images.
After reading this guide, you will be able to implement exceptional on-page SEO practices to each and every one of your pages.
Let’s get started!
Installing and Setting Up the Yoast SEO Plugin in WordPress
Before we dive into on-page SEO, you will need to first make sure the Yoast SEO plugin is installed properly on WordPress.
Fortunately, installing Yoast SEO is a cinch, and tailoring the plugin’s features to your business’s needs isn’t much harder. Follow these simple steps:
- Visit your site’s WordPress dashboard.
- Under the “Plugins” tab, click “add new”.
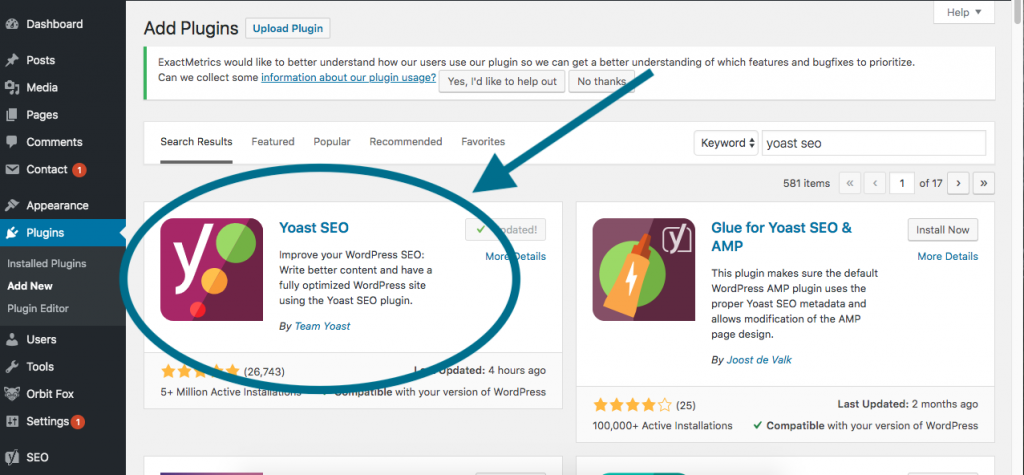
- On the “Add Plugins” page, run a search for “yoast seo”.
- One of the first options (if not the very first) should be Yoast SEO. Click “Install Now”.
That’s it! The Yoast plugin has been installed. To finish customizing the plugin’s settings, perform the following steps:
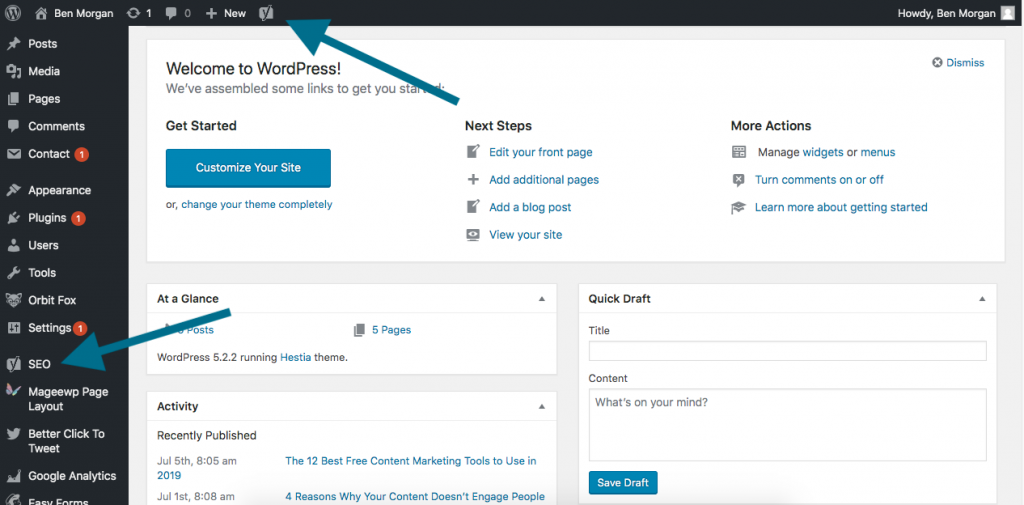
- Hover over the new Yoast icon on the top header of your dashboard and click “Configuration Wizard”.
- As prompted, complete the questionnaire to customize the plugin to you or your business’s needs,
- Once configuration is complete, go back to your dashboard and hover over the Yoast icon in the sidebar. Here, you’ll be able to further optimize the plugin for your business’s needs.
How to Perform On-Page SEO with Yoast
Now that Yoast is installed, you have everything you need to start optimizing your site’s content for search engines!
Important note before we begin: For this piece, I am using a rough draft of my first blog post (ever!) as a case study. I have omitted a number of good SEO practices that have since been implemented, and I’m using a variation of the keyphrase from the post that I actually published. I’m hoping there are enough on-page SEO mistakes and shortcomings here in this rough version to cover every single area of Yoast.
We’re going to tackle both SEO and readability; but we’re going to spend most of our time focusing on SEO, as it’s arguably more important and it’s the area where Yoast really shines.
So, let’s dive right in with our first of 12 steps for on-page SEO!
Step #1: Create a New Post or Page and Add Content
In your WordPress dashboard, hover over the “Posts” tab, and click “Add New”. Already, you should notice the Yoast SEO plugin underneath the area where your content will go.
At this point, your SEO tab will most likely be gray, and your readability tab should be red. That is, until you upload your content into your post. Go ahead and do that now!
Now, your Yoast plugin should look something like this:

Step #2: Choose a Focus Keyphrase
Note that your SEO tab is still going to be gray. This is only because you haven’t yet entered your focus keyphrase.
If you’ve already chosen a focus keyphrase and have worked it into your content, great! All you need to do is enter it into your Yoast SEO plugin. If you haven’t yet chosen a keyword or keyphrase, however, you’ll want to perform some keyword research.
Visit your preferred tool for keyword research (I use Google Ads), and find a keyword or keyphrase that meets the following criteria (or at least as much as possible):
- A decent number of average monthly searches (300-400+).
- Low-to-medium competition.
- Relevance to your topic.
- Ability to be worked into your content without it sounding forced.
Once you have your focus keyword, plug it right into Yoast.
Now, scroll down to “analysis results”. Your plugin is going to display a (perhaps long) list of problems with your content.
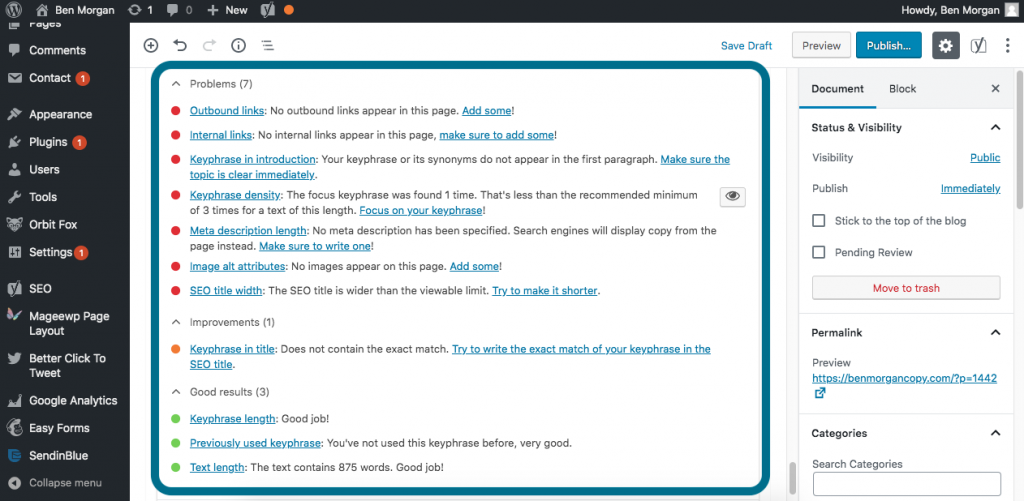
As you can see above, my raw content is flooded with issues. There are only three areas where I’m practicing good on-page SEO; and these areas are all very easy to optimize:
- Keyphrase length. As long as your focus keyphrase is less than five words, you’ll get the green light for keyphrase length.
- Previously used keyphrase. Yoast wants to see that you’re using a new focus keyphrase for each of your posts, so that your content doesn’t compete against each other.
- Text length. My content here contains 875 words, which is significantly shorter than the kind of content I want to be publishing. But for on-page SEO purposes, anything over 300 words gets the “OK” from Yoast.
These elements aside, my content (and perhaps your content) is riddled with problems that need to be addressed before hitting “publish” . . .
Step #3: Add Your Focus Keyphrase to Your Title
Once you’ve had a chance to look over your analysis results, you should try to work through your content in an order that makes sense. I like to start with the most important elements and work down the page.
So, start with your title.
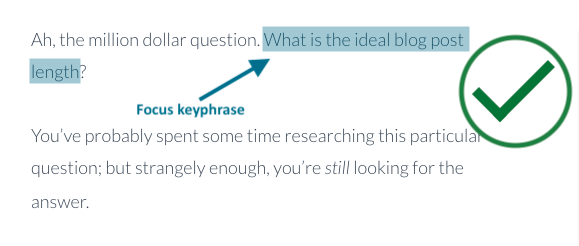
You always want your focus keyphrase to be included in your post’s title, so try to work it in without making it sound forced or wordy. Be careful not to sacrifice quality in pursuit of a perfect Yoast SEO grade.
In my post, my original title was “What Is the Ideal Length for a Blog Post? 5 Rules to Follow”. But because I chose the focus keyphrase, “ideal blog post length”, I changed my title to “What Is the Ideal Blog Post Length? 5 Rules to Follow”.
This was a simple tweak that didn’t compromise the quality of my title. I was still able to say exactly what I wanted to say.
Be careful not to sacrifice quality in pursuit of a perfect Yoast SEO grade. Share on X
Step #4: Use Your Focus Keyphrase in Your Introduction
Yoast also wants to see your keyphrase included in your post’s introduction. It doesn’t necessarily have to be used in the first sentence, but it does need to be used in the first paragraph.
In fact, even if you kick things off with a short one-liner and include your focus keyphrase in the very next section, Yoast will still penalize you because it senses that your keyphrase isn’t being used in that first paragraph.
Here’s a rough example of what I mean by this:
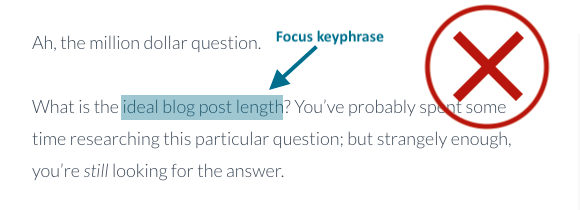
So, to avoid any frustration, try to work your keyphrase into that very first paragraph.
Step #5: Get Your Focus Keyphrase Density Right
Typically, Yoast SEO recommends a keyphrase density of .05 – 3%.
This means that, for 500-word entry, you’ll want to use your keyphrase roughly 3 – 15 times. Anything outside this range will register poorly within the plugin.
For a 2,000-word entry, you’ll want to use your keyphrase roughly 10 – 60 times.
Of course, you won’t need to know this kind of information off the top of your head. Yoast will let you know how many times you need to use your focus keyphrase, depending on the length of your content.
In my blog post, I had only used my focus keyphrase . . . once.
After sprinkling it throughout my content a few more times, Yoast approved:

However, don’t force your keyphrase into your content. When search engines crawl your site, they have their own criteria for what makes good content. If they detect that you’re keyphrase-stuffing or if they think that your content reads poorly, you’ll be penalized.
And remember, it’s more important to impress Google than it is to impress Yoast.
Step #6: Create an SEO Title
The next three steps are going to focus on the “snippet” of your post. This is the section that will appear in search engines, so it’s important that you optimize each area and make sure there are no errors. Otherwise, no one’s going to click through to your content!
We’ll start with the SEO title. Your SEO title is not the same as your post title, but rather, it is the title that organic traffic is going to see in search engine results.
In Yoast, there’s a default SEO title that you’ll be given, and it will be based on the following formula: Title > Page > Separator > Site title.
Much of the time, Yoast’s default SEO title will work well – particularly if you followed step #2 and included your focus keyphrase in your title. But there may be times when your default SEO title is too long, or times when your focus keyphrase is positioned towards the end of your SEO title. Yoast will prompt you to correct this.
Remember, it’s more important to impress Google than it is to impress Yoast. Share on X
For all of my posts, I prefer to keep things simple by only including the title, a separator, and site title in my SEO title.
When I adjusted the SEO title in the example post, it looked like this:
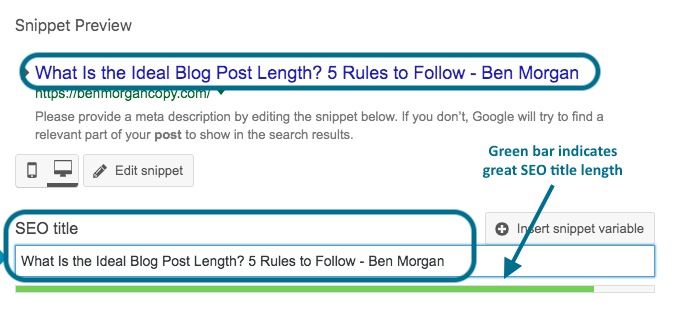
When your SEO title is a good length for search engines, the plugin will display a green bar directly beneath your SEO title. If your SEO title is too short, you’ll see an orange bar. And when your SEO title is too long, you’ll see a red bar.
Step #7: Create a Meta Description
Next, you need to create a meta description for your piece. By default, Yoast will pull the first few sentences from your introduction and make this your meta description. Sometimes this is great, but at other times . . . not so much.
When creating your meta description, make sure it checks the following boxes:
- It clearly states what your content is about.
- It presents an issue that your target audience might have.
- It teases a solution to that problem.
- It includes your focus keyword.
- It falls between 120 and 158 characters (roughly).
Here’s the meta description for the version of the blog post I ended up publishing:
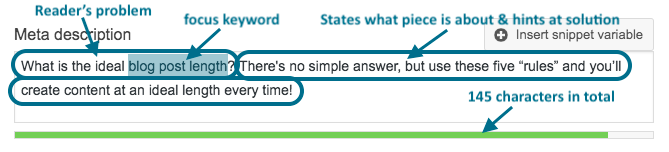
Do you see how this meta description addresses all of the bullet points from above? You should aim to optimize your meta description this way for every piece that you publish!
Step #8: Choose a Slug/Permalink
The third and final component of your snippet is your slug. Sometimes the terms “slug” and “permalink” are used interchangeably, but the two are slightly different.
A permalink is an entire URL, while a slug is a section of a URL that represents the page you’re on. So while the permalink for the post I published is https://benmorgancopy.com/what-is-ideal-blog-post-length, the slug is only “what-is-ideal-blog-post-length”.
Make sense?
You can tweak your entire permalink and the structure of your site’s pages in your WordPress settings. When creating your post’s slug, however, you just need to make sure you keep it short, include your focus keyphrase (preferably towards the beginning of your slug), and eliminate any unnecessary words or articles (“a”, “an”, “the”, etc).
As I mentioned earlier, the slug for my published piece is what-is-ideal-blog-post-length. It’s short and it includes my focus keyphrase. But better yet – readers can get an idea of what my post is about just by reading the slug!
After completing steps #5 – 7, you should have a complete snippet. The entire snippet from my published post looks like this:

Step #9: Upload Images and Set Image Alt Attributes
No post or page is complete without images. If your post has no images, Yoast will be sure to let you know!
It’s worth noting that having multiple images within a post is great for on-page SEO. But at the very least, you’ll want to make sure you include at least one image.
When uploading an image, you’ll also need to choose an alt attribute that includes your focus keyphrase.
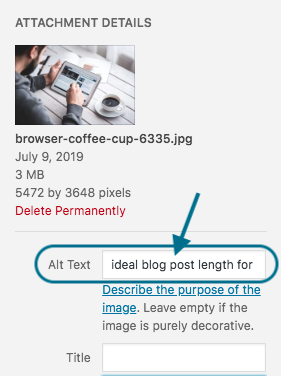
Make sure your alt text is a relevant and clear description of your image.
Step #10: Add Outbound Links
Yoast wants to see that you’re linking to other authoritative sites from your page, as this increases credibility and gives your content some real weight and substance.
There are a number of ways in which you can achieve this:
- Add a relevant, impactful, or witty quote and credit the author.
- Include a relevant fact or statistic and link to the source of that information.
- Recommend a specific product, service, or article that is relevant to what you’re writing about.
In my example post, I included a couple of facts that strengthened the point I was looking to make, linking out to each source:
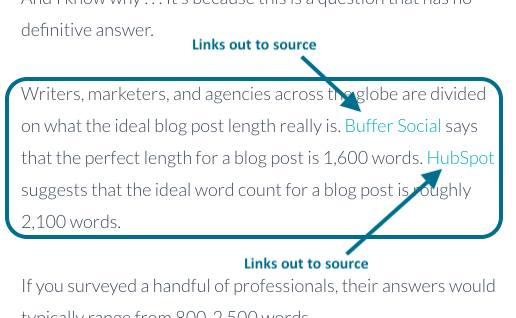
With outbound links – and any links, really – it’s easy to get lazy and throw in a somewhat irrelevant quote or fact in order to check off “outbound links” in Yoast.
Don’t do this!
Not only will Google find that your link is irrelevant, but your readers will as well.
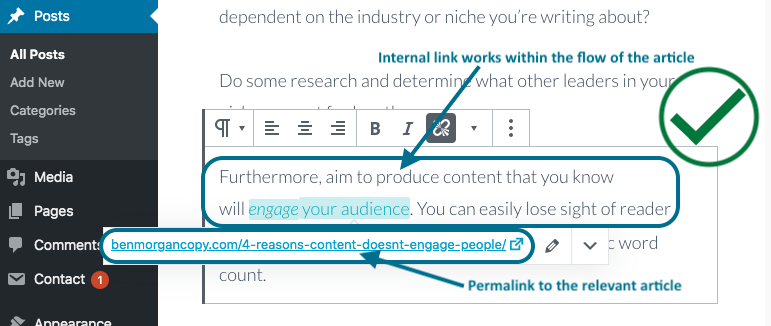
Step #11: Add Internal Links
Finally, it’s time to link to relevant articles on your own site. One of the things Google loves to see from a site is an organized link structure.
Here’s an example of how and when you can link to another post on your site:
If this is only your first page or post, there’s bad news: you’re not going to be able to achieve this – at least not right away. And that’s OK!
But in this case, I recommend you do one of two things:
- Wait until you have an archive of 5 – 10 posts that are ready to go before you publish content.
OR
- Go back and add inbound links to older pages and posts as you add more content.
After these 11 steps, the majority of your Yoast errors should be resolved! Here’s what my post’s analysis results looked like after making these changes:
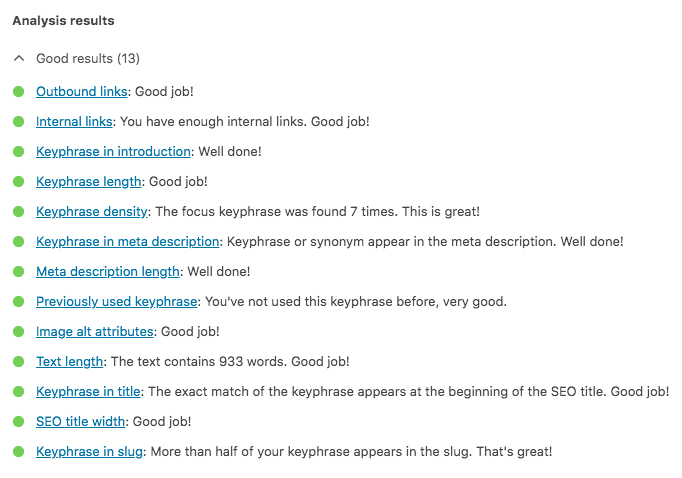
And assuming that you also followed the 11 on-page SEO steps we’ve covered so far, your post should look something like this as well.
One of the things Google loves to see from a site is an organized link structure. Share on X
Go ahead – give yourself a pat on the back!
Before we move on, there is one last step. It might not impact your Yoast SEO score, but it may very well impact your actual SEO . . .
Step #12: Select Categories and Create Meta Tags
If you’re creating a lot of content, Google wants to see that you’re organizing it within the hierarchy of your site structure.
In your post editor, your settings sidebar should show areas for categories and tags:
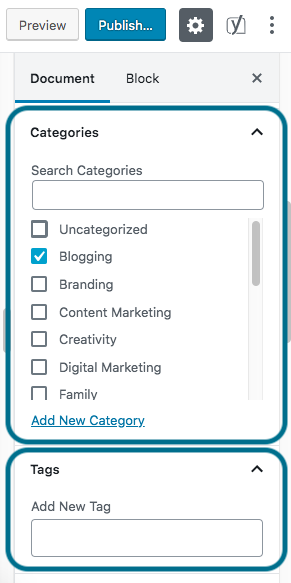
Now, I don’t believe meta tags to be very important for SEO in 2019. But if you’re old-school, super thorough, or even superstitious, you might want to take 30 seconds to rattle off a few tags that are relevant to your content.
Categories, on the other hand, are important for SEO. You don’t have to send a single post to four or five different categories (though you certainly can), but you should at least designate one category for each post.
With this out of the way (phew!), let’s move onto Yoast’s readability function!
How to Improve Readability with Yoast
Now that you’ve completed the on-page SEO for your post, we’re going to take a brief look at the readability tab in the Yoast SEO plugin.
It should look somewhat similar to this:
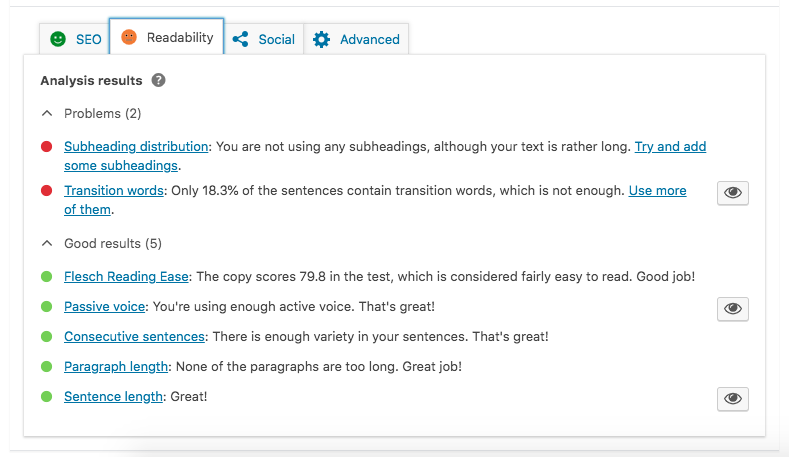
According to Yoast, this post needed some improvement in the readability department . . .
But in the post that I published, I actually didn’t change very much at all.
In fact, I have published posts with “needs improvement” readability scores before. And there’s a reason for this.
The “readability” of your post doesn’t have much bearing on your on-page SEO at all. It’s simply a tool that is designed to improve your writing. As you’d imagine, the style in which people write is dependent on a whole number of factors: brand, style guide, target audience, et cetera.
So, don’t get hung up on your Yoast readability score.
If you do, you may run the risk of ruining your writing and making it stale – all in pursuit of a little green smiley face from Yoast.
As long as your post is easy to read and you’ve checked your writing for any mistakes or inconsistencies, you may be able to publish your content as-is.
However, you shouldn’t completely neglect Yoast’s readability function either. There are four areas that you should strongly take into consideration when building your post: subheading distribution, Flesch reading ease, passive voice, and paragraph length.
Let’s discuss each of these areas in more detail.
1. Subheading Distribution
Headings and subheadings do impact SEO, and it’s important that you call them out after pasting your content into your post editor. Google looks for specific tags (H2, H3, H4, H5, etc) within your content.
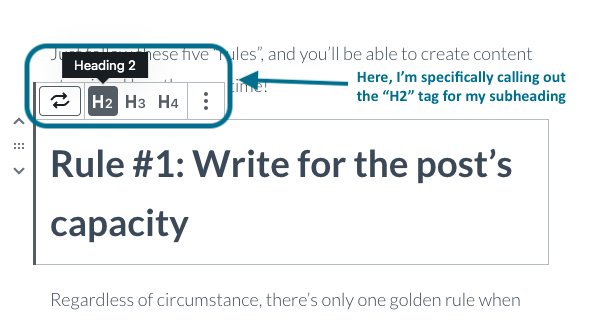
It’s rare that I go any deeper than H2 or H3 subheadings in my content, but you may! Keep your content structured by using heading and subheading tags consistently.
2. Flesch Reading Ease
The Flesch reading ease score is important, only because you’re not writing for a scholarly journal . . .
You’re writing a blog post.
Don’t get hung up on your Yoast readability score. Share on X
In most scenarios, you want people of all ages and experience levels to be able to connect with your content.
Here are a few ways in which you can improve your Flesch reading ease score:
- Keep technical terms and jargon to a minimum. Use only when absolutely necessary.
- Don’t build extremely long sentences. Anything over a couple of lines can probably be broken up into separate thoughts.
- Make sure there is structure to your writing. Long paragraph after long paragraph with no subheadings is going to impact your reading score.
- Write as if you’re actually speaking to someone. If you wouldn’t use words like honorificabilitudinitatibus or antidisestablishmentarianism in a normal conversation, there’s no need for them in your writing either.
3. Passive Voice
There are always times when it’s OK to use passive voice. But you want to be careful not to drown out active voice in the process. Active voice is typically clear and easy to understand, while an overuse of passive voice can make your writing distant and confusing.
Here’s a very simple example of active voice versus passive voice:
Active voice: The dog ate the bone.
Passive voice: The bone was eaten by the dog.
Using active voice, the dog is the subject and it’s the thing that is taking action. Using passive voice, the bone is the subject but it’s not taking action.
If you’re not an experienced writer, this one might take some practice . . . but keep at it! The more you write, the easier this will be to master.
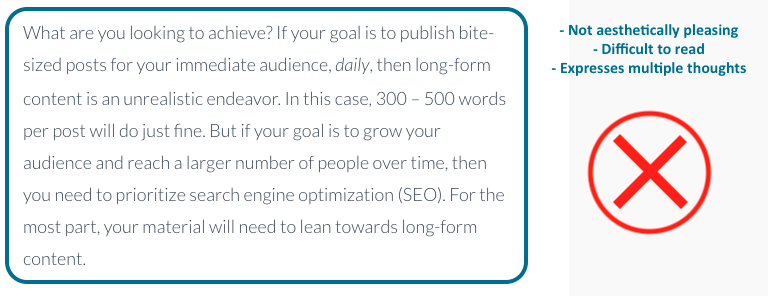
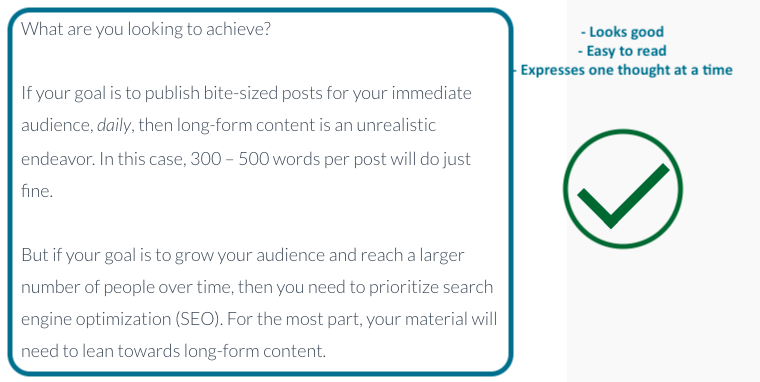
4. Paragraph Length
In a book, you can get away with six-sentence paragraphs. But online, where people are accustomed to scrolling and scanning information quickly, long paragraphs are especially difficult to get through.
As a rule of thumb, try to keep blog paragraphs to between one and three sentences. This will work wonders for not only your readability score, but also for reader engagement.
Check out this section from our example post, before and after breaking up the paragraphs:
If you can’t improve your score without lessening the quality of your writing, don’t sweat it! An average readability score in Yoast is not the end of the world.
As long as your content is engaging and easy to digest, you can hit the “publish” button with confidence!
As a rule of thumb, try to keep blog paragraphs to between one and three sentences. Share on X
Conclusion
Congratulations! You made it.
You worked through the entire process of on-page SEO using the Yoast plugin!
Now, this might seem like a whole lot of steps that you need to remember. But fret not – the Yoast SEO plugin will guide you and prompt you whenever you’re taking a step in the wrong direction.
Feeling empowered to perform essential on-page SEO practices? Ready to tackle new content of your own?
I hope this guide gives you a new sense of confidence and fresh inspiration to craft amazing, SEO-friendly content for your site!
0 Comments